Reloading a shotshell is not that hard as you might have been thinking.
However, you have to follow the guideline or the recipe properly to complete the steps successfully.
Otherwise, you will end up making a faulty shell after reloading.
A good shotshell reloading guide always comes in handy in this situation.
Sadly, I haven’t found any foolproof and straightforward step by step guide so far regarding this.
Don’t be troubled and bear with me because I’m going to show you the exact step by step process of shotshell reloading in a moment.
I’m sure this guide will suffice to provide you an overall direction to end the process successfully.
Let’s begin.
Things Required to Start Shotshell Reloading Process
- Reloading Press
- New shell or used shell
- Primers
- Gunpowder
- Wad
- Shots
- Reloading manual
I don’t want to go into every detail of each of the elements above. I believe you already know about the functionality of all those. Otherwise, you wouldn’t have landed on this page to learn the reloading process.
However, let me introduce the elements in short (in case you don’t know their basic functionality).
Reloading Press – To complete each step of reloading a shotshell, you need an excellent reloading press. I use the Lee Load-All II. You can use any brand or model you prefer.
Hull / Shell – Shell is nothing but the case where you will add powder, wad, shots, etc. You can either use a new hull or a used one.
Primers – Primers are the ones that explode and ignite the gunpowder once the firing pin of shotgun strikes them.
Gunpowder – The gunpowder burns and explodes to cause shots to come out of the gun barrel. Typically you will use grains as the measurement unit of the powder.
1 ounce = 437.5 grains.
1 lb = 7000 grains of powder.
You must use a precise reloading scale for the proper weight of the gunpowder. Read the detail discussion I have written in the review article of precise reloading scales.
Wad – The wad stays in between the powder and shots inside the shell. The cup end of the wad holds the shots.
Shot / Projectile – Simple. The shots are the objects that hit the target. Depending on the application, the size of the projectile may vary.
Reloading Manual/handbook – Following a good reloading manual or handbook is vital to know all the recipes you need to follow for the shotshell reloading process.
A useful handbook contains all the necessary reloading data.
Now, let’s move to the reloading process.
Shotshell Reloading Process – Step by Step
I use the Lee Load-All II reload press to go through each step involved in reloading. It is by far the best bet for beginners as well as for advanced users.
Step 1: Installing the Bushing and Setting Up the Press
In regards to safety, a few things you need to be careful about whenever you use any reloading tool.
In other words, you have to take the shotshell reloading data into your consideration before reloading.
For instance, you must ensure the appropriate charge of shots, powder, wad, etc.
You can buy a shotshell reloading handbook for this purpose.
It will help you to learn so much useful information related to reloading, including loading data and ample other handy instructions.
Lyman Shotshell Handbook is the most popular one among the tactical guys.
Here, I’m not going to every detail of setting up the reloading press like where you should mount it and all that.
I will be discussing just the bushing installation process as its quite crucial to fit the right bushing.
First, remove the plate from the front of the reload press using a quarter-inch nut driver.
Then pull out the charge bar. You will see two holes in it. The larger one is for the shot bushing, and the smaller one is for the powder bushing.
Place the accurate bushings in both holes (powder bushing hole and shot bushing hole).
How do you know if you are putting the appropriate bushing?
Here is when you need to use the loading data that I talked about earlier.
I took the Winchester super target 18.2 grains powder; hence, I installed 134 bushings for powder. I installed a 1 ⅛ bushing for shots.
Once you install the bushing, slide the charge bar back into the reloading press, then put the plate and the screws back in place.
Then load the machine with powder and shots.
Step 2: Hull / Case Inspection
Next, you need to scrutinize the hull, mainly if it’s a used one.
Check the hull if it’s heavily damaged or the plastic is cracked.
If you are going to use a new hull, then most likely you are not going to see any damage.
However, if it is a used one and you see it’s damaged or cracked along the plastic, better don’t use it.
Here’s a video on Hull selection:
Step 3: Resizing and De-priming
Here you will resize the shell first using your reloading press and then de-prime it.
Resizing is required if you are using a used shell. A new case doesn’t need to be resized.
Practically, both these resizing and de-priming are done at the same time by the reloading press.
The leftmost station of the press is the place where you will put the shell for resizing and de-priming.
I advise you to use a sizing ring / resizing die that you will put on the shell before you place the shell for resizing and de-priming.
You will see the gauge number is marked on the ring body. Use the accurate sizing ring against the shell.
As for the orientation of the size ring / resizing die, you will want to keep the groove at the top.
So, put the ring on the shell keeping the groove at the top and place the hull on the leftmost station of the reloading press machine.
Now lower down the handle/lever of the machine. You will see the de-priming pin of the device knocks down the old primer.
The old primer will fall through the hole of the first station.
At the same time, the brass will be resized as well. The sizing ring has another groove inside, which is responsible for pressing the brass to resize it.
A couple of things to remember here –
- Don’t de-prime a new/live primer.
- Use the accurate de-priming pin to keep the brass wad protected after de-priming.
Step 4: Re-Priming
Now take a new primer and drop it on the second station from the left. This second station of the machine is there for the re-priming job.
Place the shell on the second station.
Now pull the handle/lever down like before. It will push-in the new primer and knock off the sizing ring from the shell.
Again a few things to be careful about here.
- The shotgun primer and the rifle primer or handgun primer are not the same. See if you are using the correct primer for the shotshell or not. You should use the recommended primer by the reloading manual or reloading data.
- You will want the primer to be seated flush with the bottom of the base. If the primer is not seating correctly, then the gun might prematurely detonate it.
Step 5: Charge with Powder
At this stage, you will use the third station to add powder. The same station will be used for adding wad and shots.
You will see a wad guide at the third station. You have to angle the shell and tuck it up underneath the wad guide.
Once you place the shell underneath the wad guide, lower down the handle of the machine all the way through.
To add the powder, now you have to flick the charge bar to the right.
Things to remember-
- You must use the appropriate bushing here. I’ve already discussed this in step 1.
- Don’t make things over complicated. You will get a manual from every loader, or you can follow a handbook to get the recipe. Just make sure you are using the right bushing for that particular amount and type of the powder. It will ensure the controlled measurement of a powder charge.
- Once the powder is added, do see yourself if it was added correctly.
Now lift the handle again. It’s time to add the wad.
Step 6: Inserting the Wad
This is a pretty straightforward step.
First, set the wad in the wad guide.
Then lower the handle down, and you’re done. The wad will be added to the shell.
You will find several wads of different thicknesses and heights. Therefore, be sincere to choose the correct wad.
The idea is to keep the top of the wad below the crimping line of the shell.
Things to remember:
- The handle needs to be pulled down with sufficient pressure so that the wad seats correctly and squash the air out of the powder charge.
- Being said that, don’t press the handle down too hard when adding the wad. Otherwise, it might damage the plastic.
Here’s a video on selecting the proper wad:
Step 7: Dropping Shot / Projectile
When you end up adding the wad, you can add the shot at the same time without lifting the handle again.
To add the shot, just flick the charge bar to the right, and you will see the shots have been added in the shell.
The type of shots you will be using depends on the application.
For big game hunting, you will be using big-sized projectiles, and for bird hunting, you will be using smaller projectiles. Whatever the case is, follow the reloading manual to choose the right shot bushing.
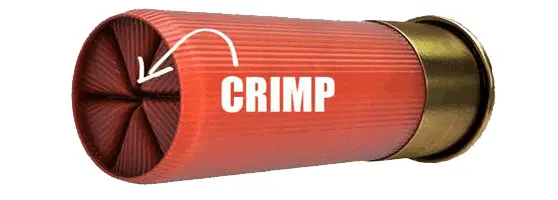
Step 8: Start Crimping
Next, move to the fourth station to start the crimping.
You will see two crimp-starters to place the shell.
Which one should you go for?
To decide that, see the crimp pattern of the shell. If it is an 8-point crimp pattern, then place it on the first crimp-starter. If it is a 6-point crimp pattern, then place the shell on the second crimp-starter (behind the first starter).
How do you know if it’s an 8-point crimp pattern or a 6-point crimp pattern?
Just count the number of grooves or folds that you see at the top part of the shell.
How do you know if the first crimp-starter is for an 8-point crimp pattern or not?
Well, the reloading press I use (i.e., Lee Load-All II) comes with the 8-point crimp pattern for the first crimp-starter, and the second one behind this first crimp-starter is for the 6-point crimp pattern.
You can check the user manual of your reloading press if you have any confusion in this regard.
Once you place the shell correctly, pull the handle down again. It will start the crimping.
Now, let’s move to the next station immediately.
Step 9: Finish Crimping
Once you place the shell on the next station, push the lever down again thoroughly to finish the crimping.
The harder you push the handle, the deeper the crimps will be. Ideally, the crimps will be 1/16 – 1/10 inch deep.
Step 10: Marking the Shells
This step doesn’t have anything to do with the reloading process. You’ve completed the reloading already.
Now, to minimize any chance of blundering, you can mark the shell to indicate which shell you will be using for which application.
Here’s a full video on it:
Final Words
Did I recommend you to wear safety glasses?
You should wear safety glasses when using the reloading press to complete the shotshell reloading.
Now, let’s have a recap.
In this shotshell reloading guide, I listed all the required items for the reloading process. I also suggested a handy handbook and a quality reloading press that you might be interested in using.
Then I wrote down the shotshell reloading process step by step. I tried to present the steps with straightforward explanations.
If you want to know exactly how much cost you save by reloading shotgun shells.
Now go ahead and try reloading a shotshell.
Feel free to get in touch if you want to ask anything in the process.